Wednesday, 28 March 2012

My First Twinchies

On UK Stampers, Catherine AKA Stitcharama-girl recently organised a Twinchie Swap, with the theme of “Faces”.  I had never made twinchies before, but I decided, rather rashly, to have a go!


Luckily I recently bought the "Kids 6" stamp from Paper Artsy, so I had some faces, but I just couldn’t think what else to do!  Time was beginning to run out on me, so I decided just to mat-and-layer with 2 backgrounds.  The middle layers are sections from some pretty ATC backgrounds that I downloaded from Lisa’s AlteredArt.  I inked the back layers with Distress Inks, then used different parts of the big background stamp from the Papillon CMS1106 stamp set by Stampers Anonymous.  I couldn’t work out how to colour the faces to suit the style of the Paper Artsy stamp, so I chickened out and left them plain.  The paper looked a bit too white, so I used some extremely watered-down Distress Inks to tint the paper very slightly.  I inked all the edges then stuck everything together.  The twinchies seemed rather too thin, so I backed them all with plain white card, and inked the outside edges again.

I’m not particularly pleased with my twinchies – I think they look a bit boring.  I just hope my recipients will forgive me, and I’ll try to make a better job of it next time!

Sunday, 11 March 2012

March postcard swap

Here's my postcard for the March swap on UK Stampers, on the theme of "Windows".


I really struggled to think of any ideas this month, but had a brainwave early this morning, as I tossed and turned after the alarm went off when it shouldn't have.  "Windows", as in 7.  I hope Bill Gates wont mind!

I've used my own photos that I took last Summer, while I was cruising on my boat.  I snapped the gorgeous sunset while I was anchored in the River Roach, and it is the "wallpaper" on my desktop.  The tiny photos are of fishing smacks and Thames barges racing in the Colne Match at the beginning of September.  These photos are a little wobbly, as I took them with one hand, whilst controlling my dinghy's outboard engine with the other, trying the keep the dinghy in the same place despite the wind and tide, and trying to keep the boats in shot.  Not an easy job at all!

I made the mock icons using the clever "shapes" tool on Serif Craft Artist, and some of the embellishments in the digikits that came with my software.  The icons at the left and the big photo were printed out as one image.  The blue-green strip at the bottom is a separate image, including its mock icons and mock date and time, and I stuck it onto the card afterwards.  I stamped the word "start", rather than using an icon, so that I could include some stamping!!!  Each of the little "windows" was assembled in Craft Artist, then printed out onto little computer-printable labels, and stuck onto the main print.  I resorted to gobbledygook for the text in the little "windows", because I hadn't a clue what to write.

I intend to put some sort of sealer on my postcard, as it will be posted "naked", but I decided to wait until I had done the photographs, in case I had a problem with the shine.  It took 8 photos, indoors and out, and 4 useless scans to get 1 usable picture!  It's that blue-green colour again, that I had problems with on my Mermaid art doll!  I just don't learn!!!!  The colours in the sunset and the little photos are very close to the original, but everything else is much too green.

Friday, 9 March 2012

My very first art doll!

I have always been fascinated by art dolls, but have never really understood them.  Having decided it was time to do something about that, I Googled “art dolls” and discovered a magazine called "Dolls United".  It is American and comes on a CD, so I wont be subscribing, but their downloadable free sample issue just happens to be all about art dolls, so I grabbed it!  There are instructions for several different projects, but the one that caught my imagination was the “Mermaid Pin” by Kathleen Chrisman.  I followed quite a lot of her instructions, because I didn't feel confident to design my own doll from scratch, but I adapted things to suit myself.  I didn't like the shrink plastic face at all, I can't draw for toffee, and I don't have a suitable stamp, so I was at loss how to make the face.  However.....

As it happens, the monthly challenge for February on UK Stampers, is to produce a piece of art that includes an image transfer and the use of a favourite stamp in a new way, with no red and no hearts.  So I decided to make my mermaid to fit in with this challenge, by using an image transfer for her face, and one of my favourite “stitch” stamps for the scales on her tail.

I went to the Stitch and Creative Crafts show at Malvern on the 3rd March, and bought some beautiful green fabric, a mixed pot of green and yellow seed beads, and some tiny hand-mirror charms.  I already had some fibres and ribbons for the hair and some pearl beads for the breasts, so I just had to dig out a slightly off-white 1960’s hanky for the main body of the mermaid, and do the image transfer.

The experts say that you can only do image transfers with laser prints, but I have succeeded several times using inkjet prints and matte multi-medium onto paper, so I decided it was worth having a go onto cloth this time.  I used a picture of a pretty woman, that I had downloaded from Lisa's Altered Art.  I painted a fairly thin layer of medium onto a scrap of hanky, and quickly laid the print face down onto it and burnished it with the back of a teaspoon.  I let it dry, then spritzed the paper with water and rubbed it off.  You can’t be as rough with an inkjet-print as you can be with a laser-print, so the transfer is very slightly “furry”, but it’s quite clear, and I am very pleased with it!

I didn’t use Kathleen’s pattern for the body of the mermaid, but drew my own, about 6.5 inches long, so that it suited the size of the face.  I marked out the shape on my old hanky, which I had folded in half.  Then I forgot the instructions!  I should have sewn round the outline at this stage, but instead I went straight ahead and painted a wide line round the outside of the outline with Viridian blue-green acrylic paint.  I dried it with my heat gun, then turned the fabric over and painted the other side the same way.  When all the paint was dry, I cut round the shape, about ¼ inch outside the line.  I decided I didn't want my mermaid to be all one colour, so I cut out the tail in green fabric and stamped the “scales”, using Coffee Archival ink and a chain-stitch stamp, which I curved to match the shape of the tail.  Then I painted the tail onto the body.   As instructed, I cut a 1” slit in the back layer only of the body, and started stuffing with cotton wool, because I couldn’t find my toy stuffing.  That’s when I realised that I should have stitched round the outline before I painted!  By now it was too late for the sewing machine, so I back-stitched round in green cotton.  Disaster averted, I finished the stuffing and sewed up the little slit.  I turned in the edges round the image-transfer, which wasn’t very easy, as the multi-medium had made the fabric rather hard, and I slip-stitched the face in position. 

Then it was time for the beads.  I strung a few seed-beads onto cotton thread, and slip-stitched them along the top of the tail, to disguise the raw edge.  I added a necklace in the same way.  I thought Kathleen’s version of the tail used too many beads, so I made mine smaller, deciding by eye how many beads to string for each loop.  After sewing the first loop of beads onto the tail, I put the needle back through some of the beads, to get to the right place to start the next loop.  I only did 5 loops, because I thought it looked the right size for my mermaid.  I was lucky enough to find 2 old pearl beads of the same size, that I had rescued from some old jewellery, so I sewed them on as breasts.

I followed Kathleen’s instructions loosely, when I made the hair.  I didn’t have many fibres of a suitable colour, so I just used 2 lengths each of brown and gold organza ribbon, a length of light-brown eyelash yarn, and a length of some fluffy off-white stuff that was left over from knitting a sheep.  I cut them all to 12inches long, and tried to coil them up, like Kathleen did.  It looked very messy, so I decided to plait all the fibres and ribbons together and sew the ends with thread, instead of tying them with a ribbon.  Following Kathleen's instructions, I sewed the plait to the back of the head, coiling it from the centre outwards, then brought the end round to the front, and stitched it down at the top of the tail.

Lastly I sewed on the tiny hand-mirror charm.  It’s slightly too small, but I think it adds a nice finishing touch to my doll.  Kathleen put a brooch-pin on the back of her mermaid, but I couldn’t see myself actually wearing mine, so I left the back plain.

The final problem was trying to take a good picture of the mermaid.  Whatever I did, the colours wouldn’t come out right, so you can’t see the lovely blue-green!


Thursday, 1 March 2012

February postcard swap

Here is my February postcard for the monthly swap on UK Stampers.  The theme was "Circles", and for some reason that immediately made me think of chain-mail!  I got the 3 digi images from 123rf.com, and then spent a merry time manipulating them and piecing the picture together with glue.


The chain-mail image didn't have an "edge", so I had to digitally remove a lot of overlapping circles, to produce the dropped "stitch" and the top row of circles.  The needle is a separate piece of paper, which I "wove" through fussy-cut circles.  There are 3 or 4 layers in that top row, and disguising the joins was a nightmare!

I had trouble finding a suitable image of a woman - I wanted a medieval woman looking shocked, but all I could find was either a medieval woman looking smug, or a modern woman looking shocked, so I had to settle for the modern woman.  The needle caused problems too - there wasn't much choice, and although I successfully isolated a needle from an image, I couldn't make it appear properly cylindrical.  By the time I had everything printed out and had started gluing, I was beginning to wish I had thought of a simpler design!

Luckily, I found that my purple Promarker reacted exactly the same on the card and the printed paper, so the background was easy.  Last of all I stamped the text, letter by letter, having very carefully planned it out so that it fitted the space.  After all that effort, I dropped the very last stamp, and got a double image!  I did a bit of cursing, but decided I just couldn't face doing the whole postcard again,  so I hope Pam, to whom I sent my card, will not mind the slight flaw.

As the postcard had to be sent "naked", I covered it with matte multi-medium, in the hope that the paper-piecing will survive the post.  Unfortunately, I touched it too soon, and pulled off a little of the needle image.  One more slight flaw, that I hope Pam will forgive!

Tuesday, 21 February 2012

My first Gothic Arch - a bit late!

On Gothic Arches the challenge from 5th to the 19th February 2012 was on the theme of "Bedecked and Beribboned".  For some time I have been tempted to join in these challenges, but I am always too slow, or I haven't got any ideas.  This time I managed to get everything together, and I'm only 2 days late!

I used 3 downloaded digi images, some stamping and some real ribbon.  The girl was a free download from the Craft Stamper magazine website, the hat was from 123rf.com, I can't remember where the background was from (sorry!).  I stamped the borders and the button using the stitch and button stamps from crafty.co.uk.  The ribbon is old stash - I bought the stripy stuff from a local market in a weak moment, there's absolutely miles of it, and I'm glad I've found something to use it for at last, before it goes all manky!


I hope Effie will forgive me going down the girl/hat/ribbon road with my gothic arch, like she did.  I'm going through a phase of putting hats on things/people at the moment, but this is the only finished "hat" item at the moment.

Sunday, 12 February 2012

Post-it-note Pad for my elder daughter


A few months ago I saw a video on YouTube, that showed a woman altering coasters to make the covers for a post-it-note pad.  I thought to myself “I could do that”, then promptly forgot all about it.

In January I saw some coasters in our local bargain hardware shop, and I remembered the video.  I bought a pack of coasters, and this is the result!


I was supposed to be making something with teal as the main colour, as that is my daughter's current favourite.  However, I couldn't find any paper in my stash that was remotely like teal, so I gave up and used a pinky-red, because it went with the post-it-note papers that I had.  I hope my daughter wont mind!


To prepare the coasters, I first peeled off the shiny printed surface, then sanded the remaining paper lightly, to give the glue a key.  I also sanded all of the shiny surface off the edges.  The coasters are about 9.5 cms square, so I was able to use just one sheet of 8 ins square oriental-patterned paper, cut into quarters, to cover the four surfaces.  I did one surface at a time, using watered-down PVA to glue the paper on.  I bent the excess paper over the edges, then sanded the excess paper off.  When the glue was dry, I dabbed all the edges with a gold Adirondack paint dabber, leaving the surface rough.  When this had dried, I stamped the oriental text background stamp onto the front and back outer surfaces, using black Archival ink.  I lightly wiped the ink off the paint, so that it left a sort-of ghost image on the gold.


Now it was time to do the binding!  This time I was lucky - I only needed six holes, so it wasn't quite as difficult to get the loops looking moderately round.


For the flower on the top, I diecut some shapes out of patterned paper backed with red card, using my Tattered Florals die, and then did some stamping with white Gesso.  The result was rather flat, so I painted the edges of the petals with my gold paint dabber.  It still looked boring, so I painted the whole of the inside of each flower shape with mica.  Much better!  To make the stamens, I cut a rough circle of black paper, fringed the edge of it, then twisted each bit of the fringe slightly.  I dabbed the edges with gold paint, to tie the black in with the rest of the colour scheme. To shape the flower, I used a sponge mat and a large ball-tool that I bought from the Glitter Girls.  I glued all the layers together with Glossy Accents, then added half of an old press-stud in the centre.  I had intended to sit the flower on a leaf, but I didn't want to add green to my colour-scheme, and I thought a black or gold leaf would look silly.  So I ended up using a flourish - again!  I diecut it out of waste mount-board using my Elegant Flourishes die, and had to trim it, as it was too large.  I painted it gold and stuck it on with Glossy Accents.  Finally, I stuck the flower on with Pinflair Glue Gel.

Canal Book for my younger daughter


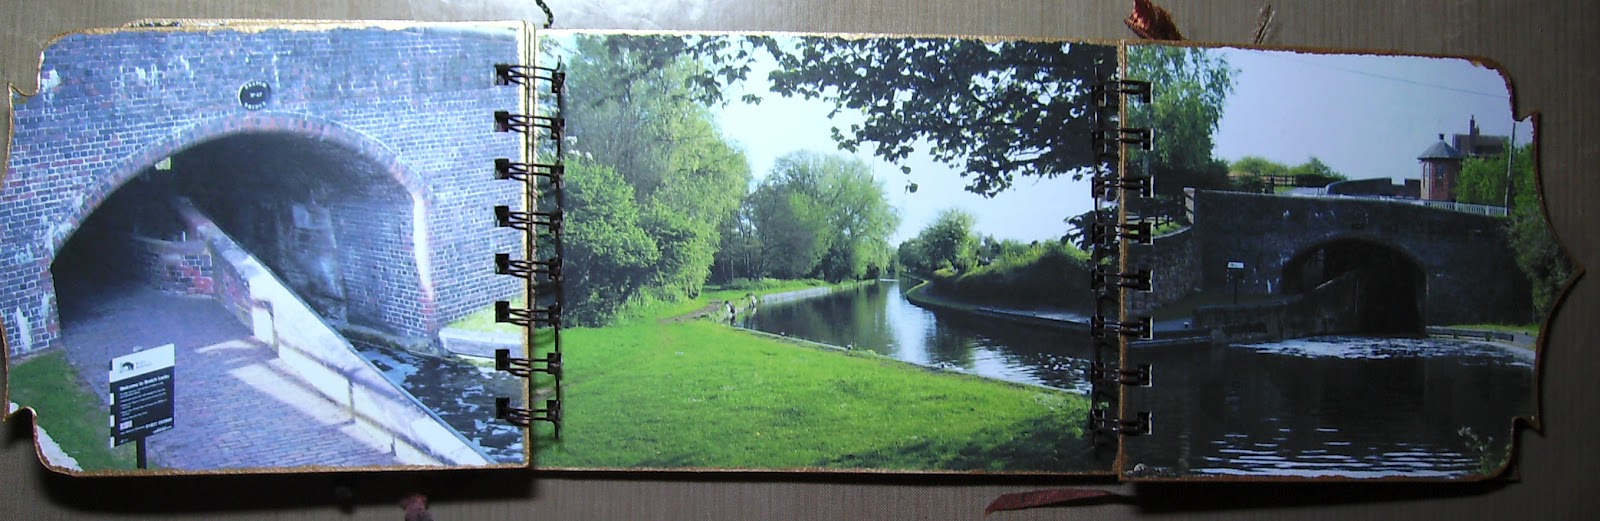
My younger daughter lives in Kent, and she misses our Midland canals.  So I decided to make her a book of canal photographs, that I took myself in Wolverhampton and at the Bratch locks during 2011.

I made the pages from offcuts of mountboard from a picture-framing shop.  I cut all the pages to the correct height but over-sized in width, then stuck the pictures on both sides with gel medium.  I die-cut the fancy edges, and used a craft knife to cut the "split" pages to fit.  I sanded the excess paper off all the edges, then painted them with a gold paint dabber.

That's when the project ground to a halt!

Originally I was going to fix the pages together with book rings, but I decided I didn’t like them, so I bought myself a Bind-it-All and some wires to use instead.  I tried out the BIA on another project first, but the binding didn’t go very well, and the loops ended up nowhere near round.  I asked for advice on UK Stampers, and Tasha (aka Chicken Licken) gave me the hints I needed.  She told me to set the squishing channel a bit wider, and to do the squishing bit by bit in stages.  It worked a treat, so I have been able to finish my book.  Thanks very much, Tasha!!


I’ve trimmed the book with bits and bobs, and I just need to put the title and “created by” on the blank areas of the back cover, then my daughter can have it.  I just hope she likes it!